Need more help?
If you have additional questions about creating a listing, let us know at support@openhomepro.com.
|
Home → Listings → Printer Friendly Version Listings
1. Creating a Listing1.1. iPad
There are different methods on how to do this depending on the device you’re using. This article will walk you through creating a new listing using your iPad. Click here if you are using an Android device. To start, log into your account. By default, you will see your "Listings" > "All" section. Tap on the "+Create New Listing" button. This will bring up a pop-up window where you can start to set up your listing. Here you can enter your listing's street address and zip code. All US addresses will prompt a search. However, if you want to manually type in the address and not choose from any of the search results or if your address is not listed, simply tap the back arrow. This will return to the previous page where you can freely type the address. When all the information is correct, tap the "Create Listing button". This will bring you to your Listing page. Here, you can tap certain attribute fields to input information, such as price, property type, square footage, bedrooms, and baths. For example, let’s say you wanted to input the listing’s price. You would first want to tap on the price field. This will bring up a pop-up window where you can type in the price of the listing. Once you’ve inputted the price, click “Done”. This information, like all of the other attribute fields you set up on the listing page, will be saved automatically. Need more help? If you have additional questions about creating a listing, let us know at support@openhomepro.com. 1.2. Android
There are different methods on how to do this depending on the device you’re using. This article will walk you through creating a new listing using your Android device. Click here if you are using an iPad. To start, log into your account. By default, you will see your "Listings" > "All" section. Tap on the "+Create New Listing" button. This will bring up a pop-up window where you can start to set up your listing. Here you can enter your listing's street address and zip code. All US addresses will prompt a search. However, if you want to manually type in the address and not choose from any of the search results or if your address is not listed, simply tap the back arrow. This will return to the previous page where you can freely type the address. When all the information is correct, tap the "Create Listing button". This will bring you to your Listing’s page. Here, you can tap certain attribute fields to input information, such as price, property type, square footage, bedrooms, and baths. For example, let’s say you wanted to input the listing’s price. You would first want to tap on the price field. This will bring up a pop-up window where you can type in the price of the listing. Once you’ve entered the price, select “Done”. This information, like all of the other attribute fields you set up on the listing page, will be saved automatically. To add your first picture to the listing, start by tapping on the “Touch ton Add” button or the camera icon. This will bring up the option to select a photo from your "Photo Library" or take a picture directly using the device's "Camera". When you have selected your first picture, click "OK" To add more photos, tap on the camera icon on the left. Need more help? If you have additional questions about creating a listing, let us know at support@openhomepro.com. 1.3. Website
Go to www.openhomepro.com and sign in to your account with your username and password. On the main Listings page, click “Create a Listing”. This will bring up your Create a Listing page, where you can set up your listing and all of its attributes. Once you’ve filled in these fields, select "Create Listing". Keep in mind that you can also make edits to your listing at any time through OpenHomePro.com. Need more help? If you have additional questions about creating a listing, let us know at support@openhomepro.com
2. Editing an Existing Listing2.1. iPad
There are different processes on how to do this depending on the device you’re using, so be sure to scroll to the correct instructions for your device. This article will walk you through how to make changes to your existing listings using your iPad device. Click here if you are using an Android device. To begin, select “All” under Listings in the control menu towards the left. This will bring you to an index of all of your listings. Tap on the listing that you’re looking to edit. You can edit any of the listing’s attributes by simply tapping on the category that you’re trying to edit (such as Price or Property Type). Here, you can type in what you’re trying to change the category to. For example, let’s say you wanted to change the price. You would need to first click on the current price to edit it.
After tapping on the price field, you are then going to be brought to a screen where you can type in the new price. Once you’ve typed in the price you’re looking to change the listing to, select “Done”. This information, like all of the other attribute fields, will be saved automatically.
If you would like to update the status of the listing, tap on the field in the top right that displays the listing’s current status. Here, you will be able to change the status to any of the options presented in the pop-up menu. Keep in mind, that the visitors will receive an automated email to alert them of any status changes you make to the listing through the app but you can turn this off from your Email settings. Need more help? If you have additional questions about editing a listing, let us know at support@openhomepro.com
2.2. Android
There are different processes on how to do this depending on the device you’re using. This article will walk you through how to make changes to your existing listings using your Android device. Click here if you are using an iPad device. To start, log into your account. By default, you will see your "Listings" > "All" section. You will see all of your listings indexed in the right column. Tap on the listing that you’re trying to edit. You can edit the listing information towards the right of the screen. To make adjustments, click on the specific field that you’re trying to edit, type in the new/corrected data, and then select “Okay”. For example, let's say you wanted to edit the price of the listing. You would want to first click on the price field. After clicking on the price, you are then going to be brought to a screen where you can type in the new price. After typing in the adjusted price, select "Done". After you have finished making all of the changes to the property, all of the updated information will be saved and displayed automatically. Keep in mind, that the visitors will receive an automated email to alert them of any status changes you make to the listing through the app, which you can from the drop-down button beside the property address. Need more help? If you have additional questions about editing a listing, let us know at support@openhomepro.com 2.3. Website
First, you will want to go to www.openhomepro.com and sign in to your account with your username and password. On the main Listings page, scroll down to the listing that you're trying to edit and click on the “Manage Listing” button. This will bring up your main Listing page, where you can edit your listing and all of its attributes. Simply click on the field that you're trying to edit and fill in the corrected data. Once you've finished updating your listing details, be sure to click on the "Update Listing Details" button towards the bottom of the page to ensure that information is saved successfully. You can make adjustments to the status or price of the listing by going into the "Price & Status" tab. Keep in mind, that the visitors will receive an automated email to alert them of any status changes you make to the listing but you can turn this off from your Email Settings. You can make changes to the pictures by clicking on "Photos". Here, you can remove previously added photos or you can upload new pictures. Wait for the page to load and your changes should be saved automatically. Need more help? If you have additional questions about editing a listing, let us know at support@openhomepro.com 3. Sharing a Listing3.1. iPad
Many agents like to share and promote their listings before their open house. There are different processes on how to do this depending on the device you’re using. This article will walk you through how to share listings using your iPad device. Click here if you are using an Android device. First, you will need to navigate to the listing that you’re trying to share. On the main dashboard of the Open Home Pro app, select “All” under Listings in the control menu towards the left. This will bring you to an index of all of your listings. Tap on the listing that you’re looking to share. You will then be brought to the listing page. When tapping on “Share to Facebook”, this will share your listing on your Facebook page. Before selecting this option, you will want to make sure you are signed into the Facebook account that you would like to post your listing to on your iPad. After tapping on the 'Share to Facebook' button on the right-hand side of the screen, select “Post”. To view your other options, tap on the share icon in the top right corner. This will bring a dropdown of share options.
Need more help? If you have additional questions about editing a listing, let us know at support@openhomepro.com 3.2. Android
Many agents like to share and promote their listings before their open house. There are different processes on how to do this depending on the device you’re using. This article will walk you through how to share listings using your iPad device. Click here if you are using an iPad device. To start, log into your account. By default, you will see the "Listings" > "All" section. You will see all of your listings indexed in the right column. Tap on the listing that you’re trying to share. This will bring you to your Listing’s page. You can directly "Share to Facebook" or tap the share icon on the upper right corner of the screen which will bring a pop-up window showing other different sharing options. When tapping on the Facebook icon, this will share your listing on your Facebook page. Before selecting this option, you will want to make sure you are signed into the Facebook account that you would like to post your listing to on your iPad. This with bring you to a pop up window where you can preview the Facebook post. When you're ready to share the listing, select “Post”. When selecting “Twitter”, you can share your listing as a tweet through your Twitter page. Like Facebook, make sure you are signed into your Twitter account on your iPad beforehand. This will bring up a pop-up window where you can preview the tweet. When you're ready to share the listing, select "Tweet". Need more help? If you have additional questions about editing a listing, let us know at support@openhomepro.com 3.3. Website
Many agents like to share and promote their listings before their open house. There are different processes on how to do this depending on the device you’re using. This article will walk you through how to share listings directly through OpenHomePro.com. When logged into your account through OpenHomePro.com, you have the ability to share your listings on Facebook, Twitter or by using the listing URL. First, you will want to go to www.openhomepro.com and sign in to your account with your username and password. On the main Listings page, scroll to the listing you want to share. To share the listing on your Facebook page, click the “Like” below the listing photo. You'll then be taken to either a “Facebook Login” or “Share on Facebook” pop-up window. Next, choose the appropriate profile or page on Facebook that you would like to share the listing to. This is particularly helpful if you are trying to share your listing on your Facebook business page rather than your general Facebook profile. Once selected, click on “Post” to share the listing. To share the listing on your Twitter page, click the “Tweet” button. You'll then be taken to a pop-up window where you can log in (if need be) and tweet the link for your listing. When you’re ready to share the listing, click on the “Post” button in the pop-up window. Listing URL To access the listing URL, click on the "Manage Listing" button, and navigate to the Property Details tab. When scrolling down the screen, you will see the Property Listing URL above the Description box. By sharing the listing URL through other venues, such as through email, you can promote your listing and open house. Need more help? If you have additional questions about editing a listing, let us know at support@openhomepro.com 4. Editing/Removing Listing Images4.1. iPad
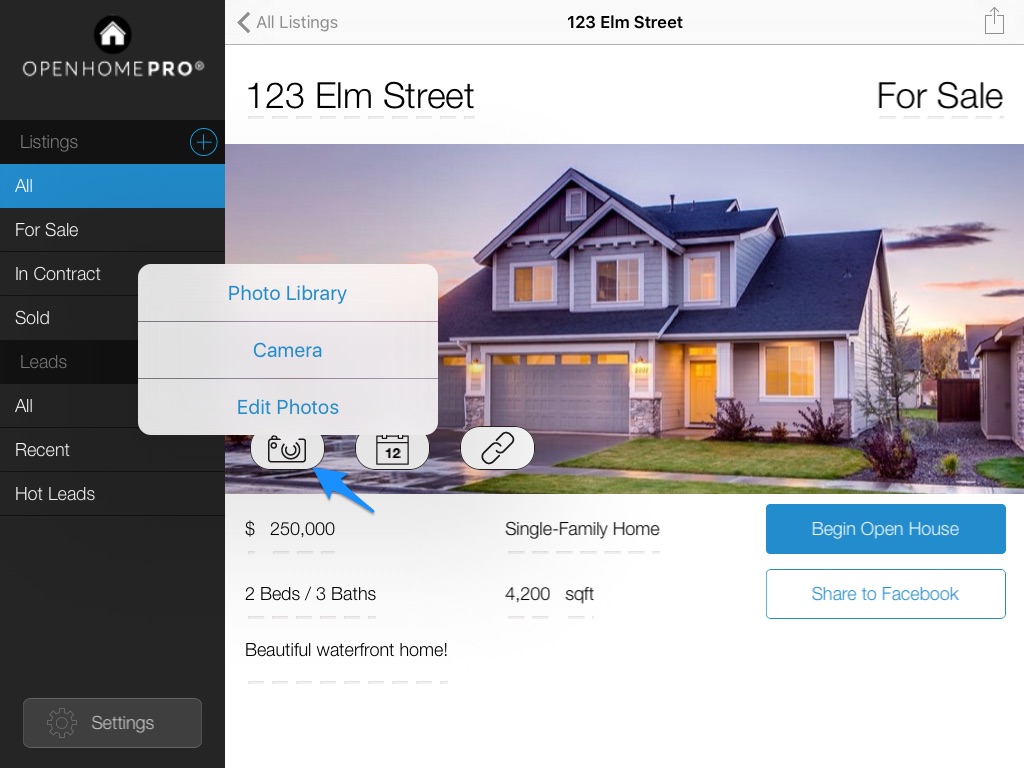
This article will show you how you can rearrange and remove your listing images through your iPad. Click here if you are using an Android device. To begin, select “All” under Listings in the control menu towards the left. This will bring you to an index of all of your listings. Tap on the listing that you’re looking to edit photos for. You will then be brought to the main listing page. Here, tap on the camera icon, located above the listing attributes. Tap on “Edit Photos”. To rearrange the order of your listing photos, simply tap on the image and drag it up or down to the desired order that you’re looking to set. To remove an image from a listing, tap the “Delete” button. Once you’ve finished making your edits to the listing photos, click “Done” in the top right of the Photos pop-up window. Any edits you make in this section will be saved automatically. Need more help? If you have additional questions about editing a listing, let us know at support@openhomepro.com 4.2. Android
This article will show you how you can rearrange and remove your listing images through your iPad. Click here if you are using an iPad device. To start, log into your account. By default, you will see your "Listings" > "All" section. You will see all of your listings indexed in the right column. Tap on the listing that you’re trying to remove photos for. This will bring you to the main listing page. Next, you will want to tap on the “Photos” tab, located to the left of the listing details. Swipe up to reveal the "Edit Photos" option. From the listing’s photo library, you can reorder the images by pressing the photo and dragging it according to which order you would like to photo to appear. To remove a photo, tap on the minus or delete " - " symbol on the left side of the banner. After removing the photo from your listing, the changes should sync and save automatically. Need more help? If you have additional questions about editing a listing, let us know at support@openhomepro.com 4.3. Website
This article will walk you through how you can rearrange and remove your listing images directly through OpenHomePro.com. First, go to www.openhomepro.com and sign in to your account with your username and password. On the main Listings page, scroll to the listing you want to upload images to, and click “Manage Listing”. Next, click on the "Photos” tab to access the images library for the listing. To rearrange the order of the photos, simply click on the image that you’re trying to move, and drag it to the desired spot between your other images. Keep holding the image until a blank grey box appears in the spot you're looking to place the image. Once the grey box appears, release the photo. To remove a photo, click on the white "X” in the top right corner of the image thumbnail. After you are done rearranging and/or removing the photo(s) from your listing, the changes should sync and save automatically. Need more help? If you have additional questions about editing a listing, let us know at support@openhomepro.com 5. Uploading Photos to a Listing5.1. iPad
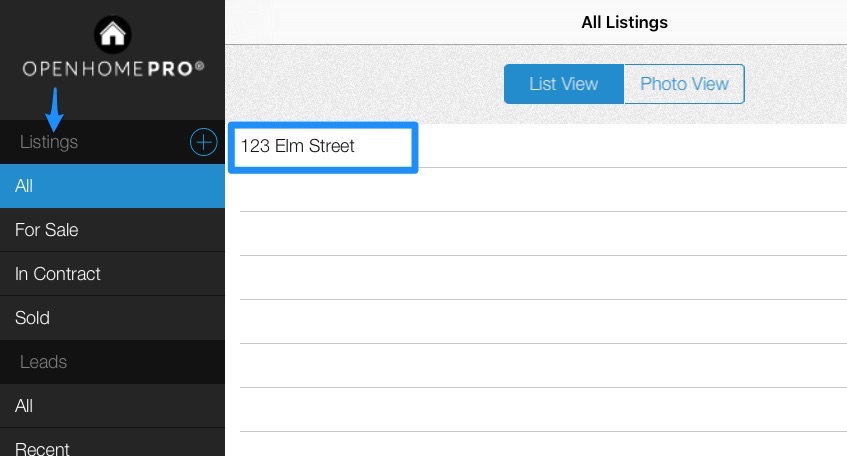
This article will show you how you can upload images to your listing through your iPad. Click here if you are using an Android device. To begin, select “All” under Listings in the control menu towards the left. This will bring you to an index of all of your listings. Tap on the listing that you’re looking to upload pictures to. You will then be brought to the main listing page. Here, tab on the camera icon, located above the listing attributes.
When tapping on “Photo Library” you have the ability to select images that you have saved in your iPad library. When tapping on “Camera” you have the ability to take photos directly with the camera on you iPad, which will be added to your listing. Keep in mind that if you take photos with the iPad Camera application while the iPad is not oriented correctly, your photos may appear upside down. When taking a photo using the iPad's camera application (not the camera function inside of Open Home Pro®) ensure that the iPad Home Button is closest to your right thumb and the rear camera is closest to the ceiling and your left hand. However, if you take a photo with the Home Button closest to your left thumb and the rear camera closest to the floor and your right hand the picture will display upside down. Need more help? If you have additional questions about editing a listing, let us know at support@openhomepro.com 5.2. Android
This article will show you how you can upload images to your listing through your Android device. Click here if you are using an iPad device. To start, log into your account. By default, you will see your "Listings" > "All" section. You will see all of your listings indexed in the right column. Tap on the listing that you’re trying to upload images to. You will then be brought to the main listing page. Next, you will want to tap on the “Photos” tab, located to the left of the listing details. Within the photos tab, you can either upload a picture from the "Photo Library" or take a photo directly with your Android camera. Need more help? If you have additional questions about editing a listing, let us know at support@openhomepro.com 5.3. Website
This article will show you how you can upload images to your listing directly through OpenHomePro.com. First, you will want to go to www.openhomepro.com and sign in to your account with your username and password. On the main Listings page, scroll to the listing you want to upload images to, and click “Manage Listing”. Next, click on the “Photos” tab. This will bring you to the section where you can upload images to your listing. You have a couple of options on how to do this through www.openhomepro.com. First, you can upload images directly through your computer when clicking on the computer icon. You can drag a photo into the uploader, or you can click on “Choose Photos” to select the image file. You also have the option to upload images from your Facebook account. After clicking on the Facebook icon, click on the “Connect to Facebook” to sign into your Facebook account so that you can access and upload your Facebook photos. When clicking on the chain icon, you have the ability to upload any photo off of the internet. All you need to do here, is post the URL of the photo, and it will upload to the listing. Please be sure to only use photos for which you have permission to use. Once you have uploaded your photos from whichever option you choose, please be sure to press the "Done" button to save the photos to the listing. Need more help? If you have additional questions about uploading and changing photos, let us know at support@openhomepro.com 6. Removing a Listing6.1. iPad
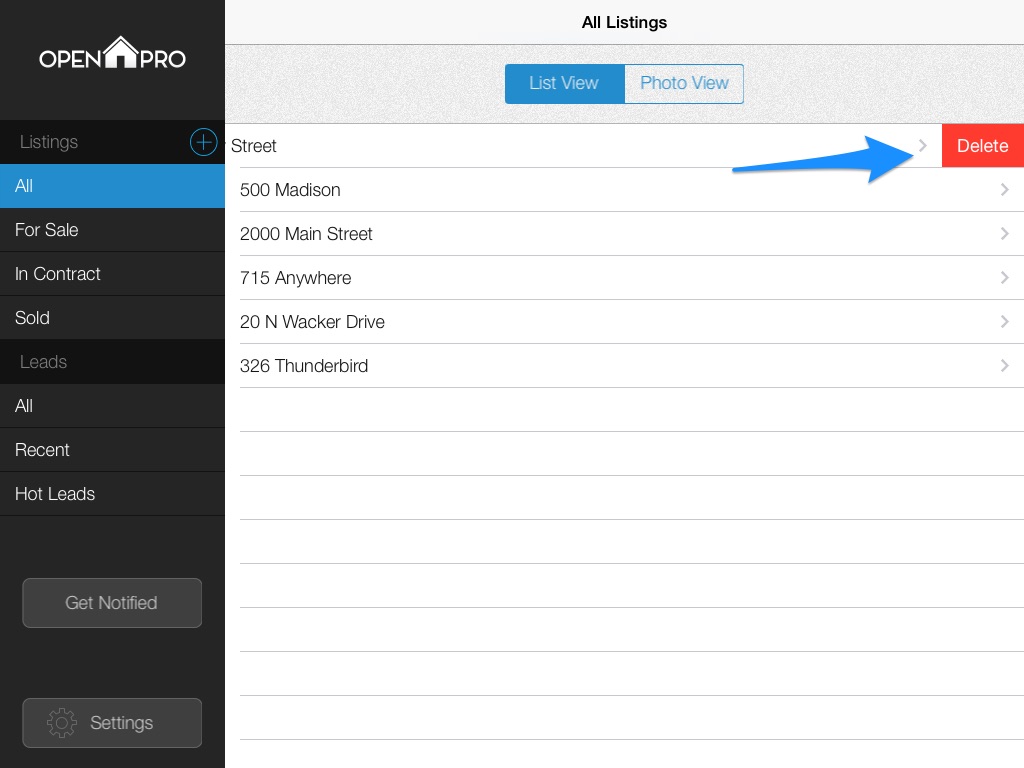
This article will show you how you can remove a listing through your iPad. Click here if you are using an Android device. To begin, select “All” under Listings in the control menu towards the left. This will bring you to an index of all of your listings.
Next, you will want to swipe towards the left on the listing you wish to delete. This will bring up a red button towards the right of the listing. Tap on this red button to delete listing.
Please note that once a listing is deleted, it cannot be recovered. That being said, any leads you collect from that listing will be saved in your account. Need more help? If you have additional questions about editing a listing, let us know at support@openhomepro.com 6.2. Android
This article will walk you through how to remove a listing through your Android device. Click here if you are using an iPad. To start, log into your account. By default, you will see your "Listings" > "All" section. You will see all of your listings indexed in the right column. Tap on the listing that you’re trying to remove. This will bring you to the listing’s page. To delete the listing, tap on the "Trash" icon on the upper right corner of the screen. Note that once a listing is deleted, it cannot be recovered. Any leads you collect from that listing will be saved in your account. Need more help? If you have additional questions about removing a listing, let us know at support@openhomepro.com. 6.3. Website
This article will show you how you can remove a listing directly through OpenHomePro.com. First, go to www.openhomepro.com and sign in to your account with your username and password. On the main Listings page, scroll to the listing you want to remove and click on the “Manage Listing” button. This will bring you to the main listing page. Click on the “Property Details” tab. Once you’re on the Property Details page, you will then want to scroll down to the bottom of the page. Finally, click on the “Delete Listing” link. Please note that once a listing is deleted, it cannot be recovered. That being said, any leads you collect from that listing will be saved in your account. Need more help? If you have additional questions about uploading and changing photos, let us know at support@openhomepro.com
|